How to upload to the PrimeTest 350 from PATGuard 2?
The PATGuard Upload feature can be used to transfer Asset information to a Seaward PrimeTest 350 to simplify retesting. Information including the Asset ID Asset ID, Description, TestSequence Sequence, Site and Location can be uploaded from PATGuard into the PrimeTest 350.
When an Asset ID is entered on PrimeTest 350 Asset Details screen, the assets stored in upload memory are automatically searched for a matching Asset ID Asset ID. If a match is found the uploaded asset data is retrieved and shown on the PrimeTest 350 display.
Preparing PATGuard for Upload
1) On the tree view on the left hand side of the screen, decide the level at which assets are to be uploaded i.e. all assets for a Client, Site or Location.
2) In the example below, the Client (Seaward) has four Sites(Bristol Factory, Durham Factory, London Factory and Newcastle) and the Durham Factory Site has been selected. This Site has seven Locations (Office 1, Office 2, Office 3, Office 4, Reception, Store Room and Workshop).
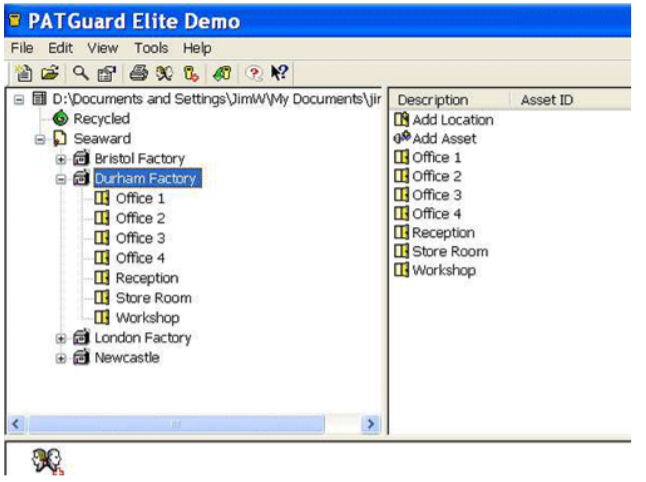
Note: The Upload Site and Upload Locations only upload the Site or Location names (these appear in the oad the Site or Location names (these appear in the list of Site list of Sites or Locations on the test instruments) and not the Assets in the Site or Location. ts in the Site or Location.
3) Right click on the icon at the required level and select Upload Assets. In the example below, all assets in the Durham Factory Site will be uploaded.

4) In this example, only the Assets in Location Office 1 will be uploaded.
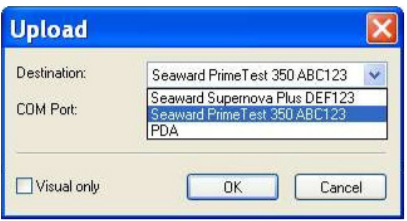
5) When the Upload window appears, select the relevant Seaward test instrument from the drop down list.

Note: Only instruments shown in the PATGuard Test Instruments tab will appear in the drop down list. nstruments tab will appear in the drop down list.
PrimeTest 350 is not shown on the Destination drop down list down list
If a PrimeTest 350 is not shown in the list of available instruments it should be added used the Add Test Instrument option in the Test Instruments tab on the bottom right hand side of the PATGuard display
When adding a new test instrument, it must be selec When adding a new test instrument, it must be selected from the drop down list. Do not simply t ted from the drop down list. Do not simply type in the tester instrument the tester instrument name.

6) PATGuard is now ready to send data to the Seaward test instrument. Do not press OK until the PrimeTest 350 has been set to receive the upload.

Setting the PrimeTest 350 to receive an Upload
1) Select Menu (F4), Data Transfer, Upload from PC
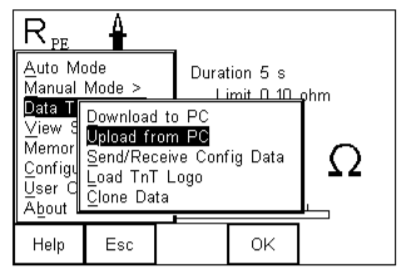
2) Check that the correct setting is shown in the Computer field i.e. RS-232 when using a cable connection or the PC name when using Bluetooth.
Uploading Data
1) Press OK on the PATGuard Upload window to start uploading data.
2) A progress bar will appear on the PATGuard screen to show the data transfer

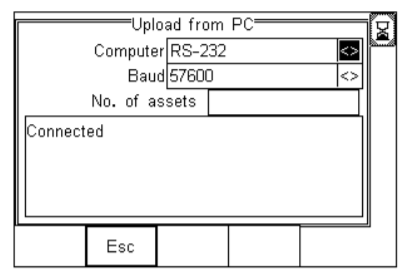
3) The Asset ID numbers will appear on the PrimeTest 350 display as they arrive until Upload is complete and the End of Data message appears below the last Asset ID.

The total number of Assets uploaded will be shown in the No. of assets field – in this case 70 Assets have been uploaded.
Viewing Uploaded Assets Viewing Uploaded Assets
1) The number of Assets in upload memory can be view be selecting Menu (F4) then Memory Options.

In this case there are a total of 189 Assets in the upload memory.
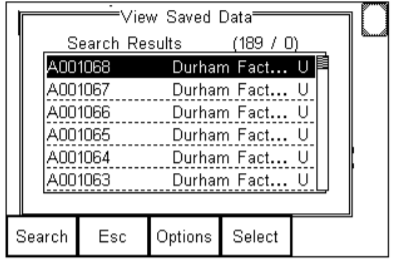
2) The Assets in upload memory can be viewed using the View Saved Data option on the PrimeTest 350 as follows. Press Menu (F4), View Saved Data, Search (F1) and change the Test Status field to Uploaded as shown.

3) Press OK (F4) to show all Assets in the upload memory. Uploaded Assets are marked with a “U” on the right hand side of the display.
Retesting Uploaded Assets Retesting Uploaded Assets
1) Press Menu (F4) and select Auto Mode Auto Mode
2) In the Asset Details field, enter the Asset ID of an item uploaded for retest

3) Press Re-test (F3) to show the Last Test Details Last Test Details

4) The uploaded Asset information, including Site, Location and Test sequence are shown.
5) Press Re-test (F4) to begin the test sequence.
Don't know what you're looking for?
The Seaward PAT tester selector will guide you to your ideal tester, based on some simple questions.
I'd like to talk to a sales advisor
Our team of sales
advisors are on hand to help you with any
queries you have about our products.










Sign up to our Newsletter.
Stay up to date with the latest industry and product news, as well as our free educational content such as webinars and our expert guides.
Close