What are test codes on the Rigel 288+ and how do I create them?
The benefit of using test codes is that you will not have to set up the applied parts for each individual test and the 288+ recognises the test sequence required to reduce user error and set up time. A test code can be up to four digits and can be set up according to Class I or II, Classification (B, BF or CF) and number of Applied Parts or to correspond with a piece of test equipment e.g. hospital bed could be BED or Microscope could have the test code MS.
Creating Test Codes
1) Switch on the Rigel 288+
2) Press F4 Menu on the 288+
3) Select Set-up
4) Select Test Codes
5) Then select F1 to create a new code
6) Select F4 to go into the Edit Test Code menu and select F4 again to edit the name (e.g. 1CF2 indicates Class I, CF, 2 Applied Parts). Also confirm the Run Mode (Manual, Automatic or Semi-Automatic)
Note: A list of example test codes and names are provided at the end of this application note.
7) Still in the Edit Test Code Name menu select F1 to set up the Classification and Applied parts.
8) Select F1 to Edit and then F4 to confirmand save.
9) Back in the Edit Test Code menu select F1 to add the Test Sequence. A dropdown list will appear for you to choose a test sequence.
Note: If you require a custom test sequence this should be created prior to setting up a test code.
10) Then select F4 to Confirmand Save the Test Code.
Using a Test Code
To perform a test using the above test codes see the instructions below:
1) Switch on the Rigel 288+
2) Press F4 Menu on the 288+
3) Select Auto mode
4) Enter your asset ID
5) Enter one of the below test codes into the Test codes field and press F4.

Figure 1 : Applied part types and their corresponding symbols
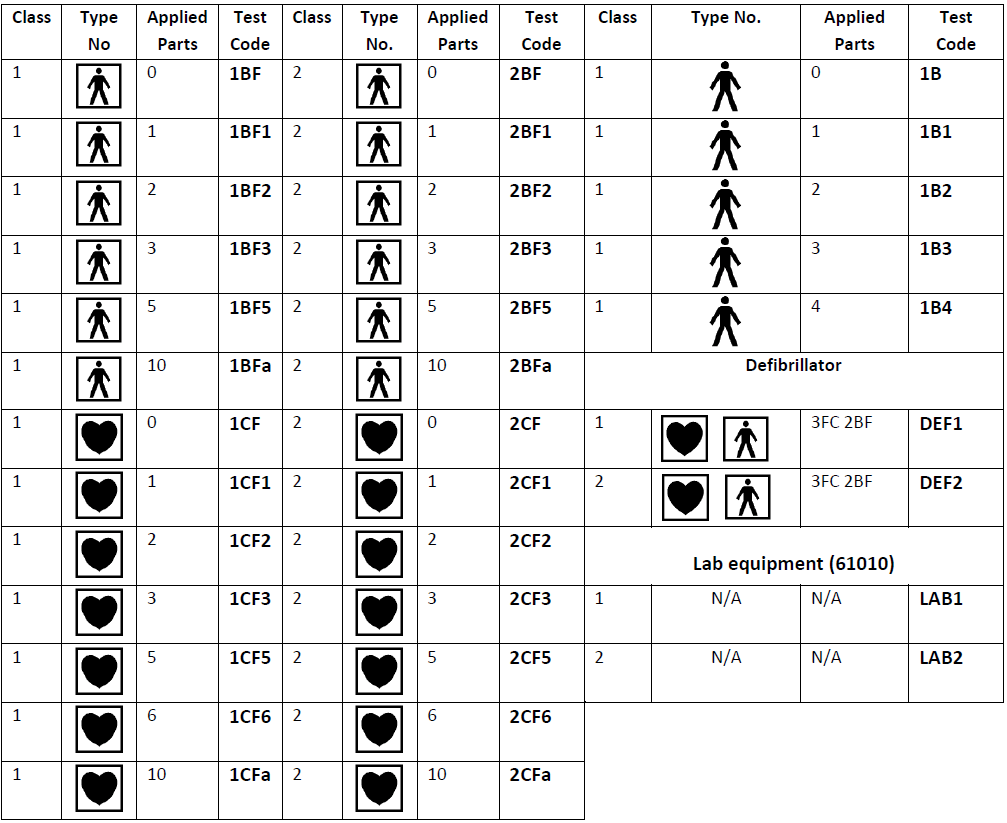
Figure 2: Example of IEC 60601 Standard Test Codes
I'd like to talk to a sales advisor















Sign up to our Newsletter.
Stay up to date with the latest industry and product news, as well as our free educational content such as webinars and our expert guides.
Close