What is the process for transferring data between the Uni-Therm and Med-eBase?
This application note explains how to communicate results, test sequences etc. between the Rigel Uni-Therm and Rigel Med-eBase software.
Downloading results from the Uni-Therm to Med-eBase
On the Uni-Therm:
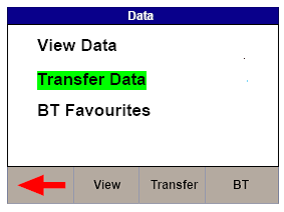
1) Go to Menu, Data, and Data Transfer.
2) In the Data Transfer menu the user must select USB PC Connection by selecting Port.
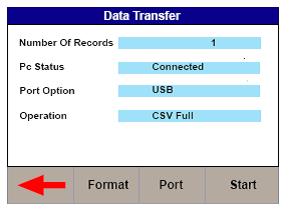
3) Then the correct Operation must be chosen. The operations are divided into Export or Import and also into format or type of file e.g. SSS, CSV Full, CSV Summary, Test Sequence, Results, Ref Graph. The user will need to select the appropriate operation which for downloading results would be Export SSS and then press Start.
4) Connect a USB cable between the Rigel Uni-Therm and the PC making sure you use the lower of the two
USB connectors on the side of the Uni-Therm
5) This will then lead to the Transfer Ready screen which will then tell you to copy the results file using Med-eBase.
On Med-eBase:
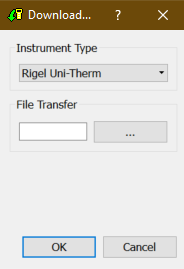
1) Select Download from Tester and select Uni-Therm.
![]()
2) Then press the ... button for the file transfer. From here you will need to save the results from the removal disk (which is the Uni-Therm) which will then download into Med-eBase.
Uploading Test sequences from Med-eBase onto the Uni-Therm
On the Uni-Therm:
1) Go to Menu, Data, and Data Transfer.
2) In the Data Transfer menu the user must select USB PC Connection by selecting Port key and Import Test Sequences using the Operation key
3) Then select Start
4) Connect the USB cable between the Rigel Uni-Therm and the PC
On Med-eBase:
1) Firstly the user would need to create a test sequence using Med-ebase.
2) Once the test sequence is created select ok to return to the main global sequence menu.
3) From the global test sequence menu select the sequence and then Upload. The screen below will then appear.
4) The user must make sure the correct instrument type is selected and then click on the … for file transfer.
5) Then select the removal disk (Uni-Therm) so save the sequence onto the Rigel device
6) Select Save and then Ok.
On the Uni-Therm
1) Select OK
2) Then the Import Complete screen should appear to indicate that the import is complete
3) To confirm the test sequence has been uploaded go back to the main menu select Menu, then Setup and then Test Sequences. In the Test Sequence screen the name of the global test sequence should be visible. From here the user can view and edit the test sequence or run the test on the Uni-Therm.
I'd like to talk to a sales advisor















Sign up to our Newsletter.
Stay up to date with the latest industry and product news, as well as our free educational content such as webinars and our expert guides.
Close